
|
PLEASE PATRONIZE OUR SPONSORS!


|
|||||||
 |
|
|
Thread Tools | Display Modes |
|
#331
 08-23-2011, 09:45 AM
|
|||
|
|||
|
Quote:

|
|
#332
08-23-2011, 11:46 AM
|
||||
|
||||
|
Huh, that was unexpected feedback. That's the original bearing reinstalled - I probably shouldn't have taken it out in the first place but when I disassembled it, I thought bearing replacement would be a standard part of rebuilding.
So regarding them not lasting very long, they've run since 1978 anyway. And the manual does specifically say "If using a shielded type bearing, install with shielded side facing toward inside of block." I'm OK with removing it if it's not needed, though. Does it just pry out of there?
|
|
#333
08-23-2011, 12:12 PM
|
||||
|
||||
|
Quote:
__________________
DWayne 1973: 128, ag tires, 3pt. lift, spring assist, lights, 42" Deck 10" moldboard plow 2016 XT1 42" deck 18HP
|
|
#334
08-23-2011, 12:58 PM
|
||||
|
||||
|
Here's a pic of that bearing on disassembly. The shielding is slotted.
Quote:
|
|
#335
08-23-2011, 02:25 PM
|
||||
|
||||
|
Guys, I think I found a major problem. I'm going to hold off on getting really, really angry for a moment until some of you have had a chance to look at it.
While getting ready to reinstall the camshaft, I noticed that the block had a piece missing where the camshaft pin goes through, on the tappet side. 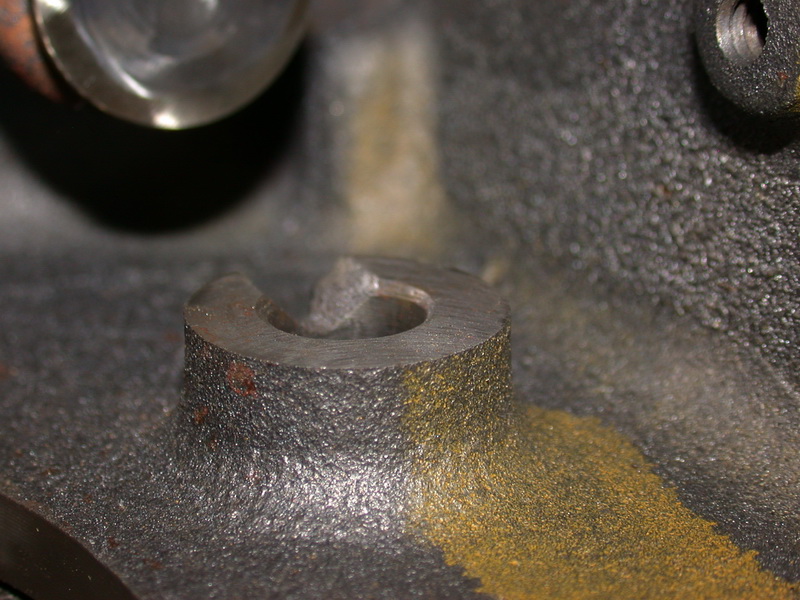 I reviewed my pictures from engine disassembly, and it was there when it was disassembled but I did not notice it. I was worried that I may have done it when I drove the pin out, but the bolt I used to drive it was on the other end of the pin. Here is the pic from July 18th:  And another one from July 18th showing that the piece was missing then:  Perhaps it happened as a result of that badly stuck exhaust valve? The scrap yard did start the engine with starting fluid when that valve was stuck, and maybe the extreme pressure that was put on the camshaft trying to move that stuck valve caused this? I don't know. I didn't find a large metal fragment during disassembly, but that doesn't mean it wasn't there. I could have missed it. So, the $64K (or at least several hundred dollar) question: Is my block JUNK? If so, I wasted $105 and a lot of time on getting it machined, and now I'm looking at big bucks for a replacement.
|
|
#336
08-23-2011, 02:38 PM
|
||||
|
||||
|
Dave, it looks like that is an old break. How much "meat" is left from the break to the outside of the block? I would try to sand/debur the edges down to prevent and more cracking. As long as the camshaft rod is tight when reinstalled I think it would be ok. Don't forget to lube the camshaft rod with oil to prevent camshaft damage at start up. Hang in there!

__________________
Nemesis
|
|
#337
08-23-2011, 03:04 PM
|
||||
|
||||
|
The block is about .810" thick at that point, and the chip extends down about .160", so there's .650 of decent block for the shaft to sit in. I can't see any further cracking in the hole.
But the inside edge, where the break is, is missing about .400" of surface. Those shims and the camshaft would have to run on a surface missing that chunk. What would indicate that it was an old break?
|
|
#338
08-23-2011, 03:26 PM
|
||||
|
||||
|
Quote:
__________________
Nemesis
|
|
#339
08-23-2011, 03:35 PM
|
|||
|
|||
|
Quote:
|
|
#340
08-23-2011, 04:50 PM
|
||||
|
||||
|
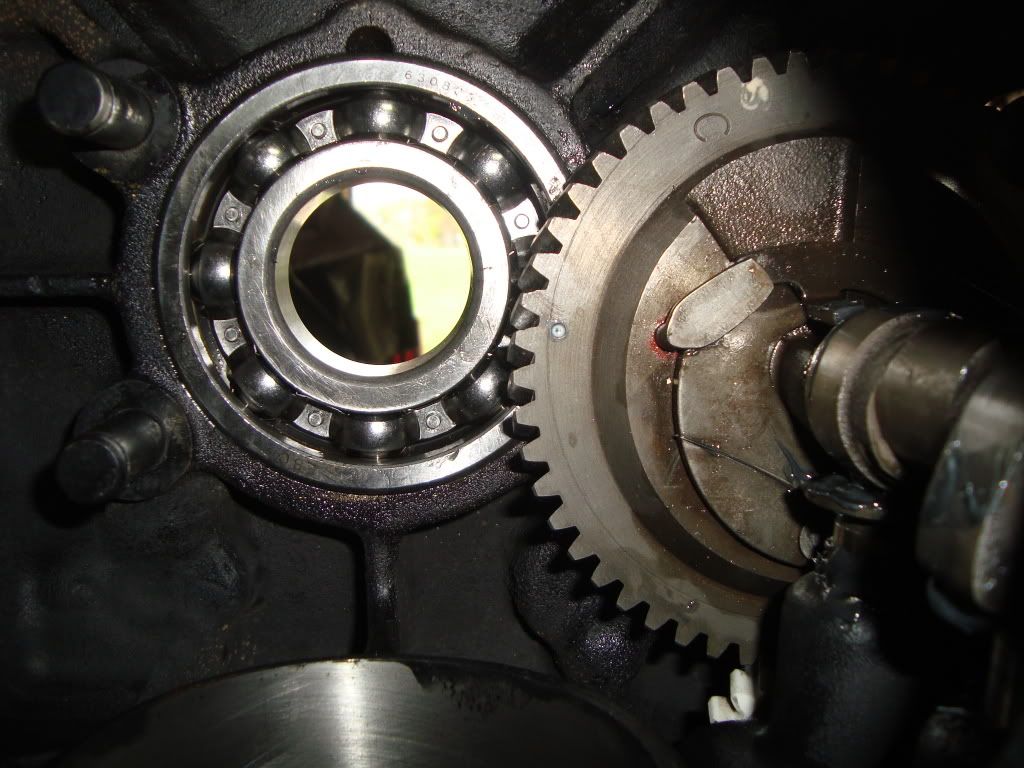
Another consideration is that my K341 has the "short" camshaft pin, so you have to recess it .300" on the bearing plate side (the side that's missing the chunk) so the shaft will be sitting in about .340" of solid hole. <edit> It's not the short shaft, it's the long one. But by the time you drive it flush with the PTO side, it's still .300 into the bearing plate side, so this is still a valid observation</edit>
The shims didn't appear to be in bad shape. One was .010 and the other was .005. And I'll need another .010 of shimming on this to get it to Kohler spec. I wish they'd include things like this in the rebuild kit. Another thing I noted is that the Kohler manual (on disassembly) tells you to drive the pin out from the bearing plate side to the PTO side, and I did it in reverse when I disassembled it. I wonder if I *did* cause this break. <EDIT 8/24/11 - on second review, I DID remove it correctly. It's supposed to be tapped out from the PTO side TO the bearing plate side, as I did.</EDIT>
|
|
|
|
Cub Cadet is a premium line of outdoor power equipment, established in 1961 as part of International Harvester. During the 1960s, IH initiated an entirely new line of lawn and garden equipment aimed at the owners rural homes with large yards and private gardens. There were a wide variety of Cub Cadet branded and after-market attachments available; including mowers, blades, snow blowers, front loaders, plows, carts, etc. Cub Cadet advertising at that time harped on their thorough testing by "boys - acknowledged by many as the world's worst destructive force!". Cub Cadets became known for their dependability and rugged construction.
MTD Products, Inc. of Cleveland, Ohio purchased the Cub Cadet brand from International Harvester in 1981. Cub Cadet was held as a wholly owned subsidiary for many years following this acquisition, which allowed them to operate independently. Recently, MTD has taken a more aggressive role and integrated Cub Cadet into its other lines of power equipment.
This website and forum are not affiliated with or sponsored by MTD Products Inc, which owns the CUB CADET trademarks. It is not an official MTD Products Inc, website, and MTD Products Inc, is not responsible for any of its content. The official MTD Products Inc, website can be found at: http://www.mtdproducts.com. The information and opinions expressed on this website are the responsibility of the website's owner and/or it's members, and do not represent the opinions of MTD Products Inc. IH, INTERNATIONAL HARVESTER are registered trademark of CNH America LLC
All material, images, and graphics from this site are the property of www.onlycubcadets.net. Any unauthorized use, reproductions, or duplications are prohibited unless solely expressed in writing.
Cub Cadet, Cub, Cadet, IH, MTD, Parts, Tractors, Tractor, International Harvester, Lawn, Garden, Lawn Mower, Kohler, garden tractor equipment, lawn garden tractors, antique garden tractors, garden tractor, PTO, parts, online, Original, 70, 71, 72, 73, 76, SO76, 80, 81, 86, 100, 102, 104, 105, 106, 107, 108,109, 122, 123, 124, 125, 126, 127, 128, 129, 147, 149, 169, 182, 282, 382, 482, 580, 582, 582 Special, 680, 682, 782, 782D, 784, 800, 805, 882, 982, 984, 986, 1000, 1015, 1100, 1105, 1110, 1200, 1250, 1282, 1450, 1512, 1604, 1605, 1606, 1610, 1615, 1620, 1650, 1710, 1711, 1712, 1806, 1810, 1811, 1812, 1912, 1914.


 Linear Mode

