
|
PLEASE PATRONIZE OUR SPONSORS!


|
|||||||
 |
|
|
Thread Tools | Display Modes |
|
#71
 07-08-2011, 01:23 PM
|
||||
|
||||
|
On the topic of those spindle bearings, I was doing more research and found that OCC's own Diz Jr. had opened one up to take a look at it in his 42" Deck Rebuild thread. I wanted to reproduce his pics here because they're awesome and add context:
.  . 

|
|
#72
07-08-2011, 04:55 PM
|
||||
|
||||
|
I'm getting ready to rebuild the carburetor, and the Kohler service manual tells me that "further disassembly to remove the throttle and choke shafts is recommended only if these parts are to be replaced."
I've read that too much "play" in your throttle shaft can cause problems, so how do I measure "play" and know how much is OK? I've also read that "More than .010" of play is considered too much for throttle shaft wear." OK, that's a bit more info. So I checked out the throttle shaft thusly: First, I measured the gap when pulling it outward with a feeler gage. There's about .040" of play there, but I'm sure that's not what we're measuring. . 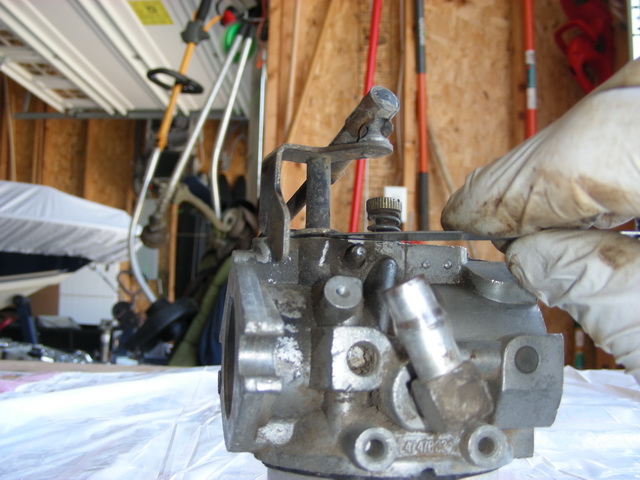 . Then I wanted to measure the "wobble" of the shaft, the side-to-side play. The best way I could figure to do this was to stand the carb on its end and put a caliper between the bench and the shaft. This way, I could hold the carb down, hold the shaft at one side of the bushing, then raise the shaft to the other side of the bushing and measure the difference: . 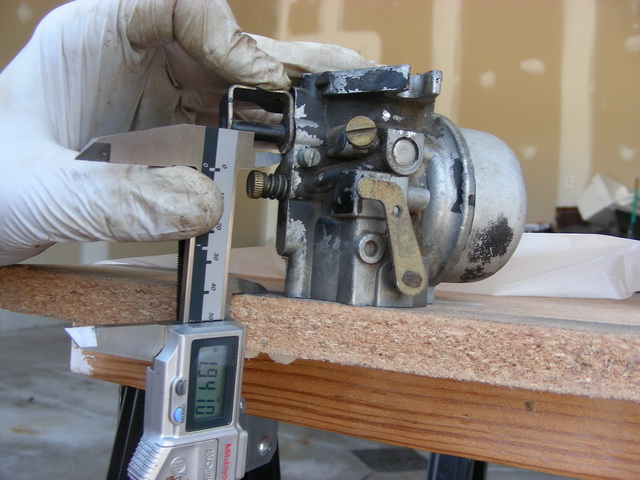 . I'm getting about .005 to .006 in play using this method. I guess it's OK, but your thoughts would be appreciated. The choke shaft seems to be solid, almost no play at all, so I'm not going to be concerned with that one.
|
|
#73
07-08-2011, 06:42 PM
|
||||
|
||||
|
Pretty much any side to side movement or wobble is bad.
Here my link on part numbers and replacement screw size for the throttle plate: http://www.onlycubcadets.net/forum/s...ad.php?t=10329 To remove the plate screws file off the back side of the screws first as they have been staked. This should allow them to come out without breaking.
__________________
DWayne 1973: 128, ag tires, 3pt. lift, spring assist, lights, 42" Deck 10" moldboard plow 2016 XT1 42" deck 18HP
|
|
#74
07-08-2011, 08:00 PM
|
||||
|
||||
|
Yeah, I see that it's only a couple bucks for the bushing, and you use your old shaft, so not too big of a deal to do that job. I was thinking it was going to be a $40 thing earlier.
|
|
#75
07-08-2011, 08:07 PM
|
||||
|
||||
|
Quote:
__________________
DWayne 1973: 128, ag tires, 3pt. lift, spring assist, lights, 42" Deck 10" moldboard plow 2016 XT1 42" deck 18HP
|
|
#76
07-08-2011, 08:17 PM
|
||||
|
||||
|
Re-reading Matt's instructions, I see that he did the same thing with the bushing, so now I'll see if my local Ace hardware has that part so I don't have to mail order it.
|
|
#77
07-09-2011, 10:35 AM
|
||||
|
||||
|
Dave,
Nice pictures! And documentation on your restoration project for the 1650! I think I may replace the bushing in the carb on the 127. It doesn't idle worth crap. Is there a part number at Ace? or do you have the size of the bushing? Regards, Chris
__________________
Casbohm Maple and Honey www.mapleandhoney.com Cubs: 147R and the "train", 127 elec lift, 127, 125, 106, 102, 100, 86, 73, Brinly plow, Snow thrower, 2 Rototillers, several mower decks and several snow plows, #1 cart, Grandkids barrel cart.
|
|
#78
07-09-2011, 11:27 AM
|
||||
|
||||
|
DX3 had all that in his post:
http://www.onlycubcadets.net/forum/s...ad.php?t=10329 The Servalite part number is: ST814-2 They were about .80/each Size is 7/16"x1/4"x1/16"
|
|
#80
07-10-2011, 08:09 PM
|
||||
|
||||
|
Great writeup! Very thorough....
In regards to throttle shaft bushings - when I first got my 129 in April, i could barely get it to stay running even after a good cleanin and tuning. Every bit of throttle control from linkages to throttle shaft rattled like a you know what. I've always been impatient, so I scoured the house looking for a bushing to get the Cub ready to run. Found one of those small washers that fit in a household faucet. Drilled out center hole and trimmed the edges, lubed the I.D. to allow throttle shaft to move freely. Worked perfectly for the last few months, the engine idled perfectly afterwards and lost it's high RPM misfiring. I actually giggled after seeing that my rigged up bushing worked  Took carb off the other day to adjust valves and remembered that I had picked up a bronze bushing at Tractor Supply in the hardware section. Had to grind the "hat" of the bushing off to get it to mount flush with the carb body, but other than that it was a perfect fit.
|
|
|
|
Cub Cadet is a premium line of outdoor power equipment, established in 1961 as part of International Harvester. During the 1960s, IH initiated an entirely new line of lawn and garden equipment aimed at the owners rural homes with large yards and private gardens. There were a wide variety of Cub Cadet branded and after-market attachments available; including mowers, blades, snow blowers, front loaders, plows, carts, etc. Cub Cadet advertising at that time harped on their thorough testing by "boys - acknowledged by many as the world's worst destructive force!". Cub Cadets became known for their dependability and rugged construction.
MTD Products, Inc. of Cleveland, Ohio purchased the Cub Cadet brand from International Harvester in 1981. Cub Cadet was held as a wholly owned subsidiary for many years following this acquisition, which allowed them to operate independently. Recently, MTD has taken a more aggressive role and integrated Cub Cadet into its other lines of power equipment.
This website and forum are not affiliated with or sponsored by MTD Products Inc, which owns the CUB CADET trademarks. It is not an official MTD Products Inc, website, and MTD Products Inc, is not responsible for any of its content. The official MTD Products Inc, website can be found at: http://www.mtdproducts.com. The information and opinions expressed on this website are the responsibility of the website's owner and/or it's members, and do not represent the opinions of MTD Products Inc. IH, INTERNATIONAL HARVESTER are registered trademark of CNH America LLC
All material, images, and graphics from this site are the property of www.onlycubcadets.net. Any unauthorized use, reproductions, or duplications are prohibited unless solely expressed in writing.
Cub Cadet, Cub, Cadet, IH, MTD, Parts, Tractors, Tractor, International Harvester, Lawn, Garden, Lawn Mower, Kohler, garden tractor equipment, lawn garden tractors, antique garden tractors, garden tractor, PTO, parts, online, Original, 70, 71, 72, 73, 76, SO76, 80, 81, 86, 100, 102, 104, 105, 106, 107, 108,109, 122, 123, 124, 125, 126, 127, 128, 129, 147, 149, 169, 182, 282, 382, 482, 580, 582, 582 Special, 680, 682, 782, 782D, 784, 800, 805, 882, 982, 984, 986, 1000, 1015, 1100, 1105, 1110, 1200, 1250, 1282, 1450, 1512, 1604, 1605, 1606, 1610, 1615, 1620, 1650, 1710, 1711, 1712, 1806, 1810, 1811, 1812, 1912, 1914.


 Linear Mode

