
|
PLEASE PATRONIZE OUR SPONSORS!


|
|||||||
 |
|
|
Thread Tools | Display Modes |
|
#11
 07-18-2009, 02:07 PM
|
||||
|
||||
|
I have a similar diagram in my service manual, although yours is a lot nicer.
I am still not sure where the actual neutral safty switch is located on the tractor. But here is a quick update along with new problems Last night I was able to install a timesert to repair the stripped sparkplug threads by the previous owner. I also got the new solienoid and wired it corectly (I left the two unknows disconnected). I can now use the key to start the tractor (if it ran). Woot. So the new problem is...... it will only run with a shot of starting fluid. Other then that you get nothing. I went through and cleaned the carb on the tractor, and double checked fuel was getting into the bowl, all is good. I then took the carb off the tractor and realized that the main jet rod is actually stuck in the carb, I tried giving it a few taps from the bottom, but I did not want to damage it. I have it soaking in some PB Blaster. my new question is should this Main jet/rod come out the top when you remove the main adjuster? Or does the rod stay in the carb? I would think it should come out. Well I am out for the rest of weekend, looks like I will have to attack it monday after work. The grass is almost tall enough to cut, I really want to get it running so I don't have to use my silly Snapper any more. Thanks 
|
|
#12
07-18-2009, 02:21 PM
|
||||
|
||||
|
punkid,
The "rod" comes out of the main jet when you remove the screw head that adjusts it. It's one piece. The main jet might be a PITA to get out. The one thing I have yet to try to try and get a suborn one out is to first boil the piece with some tide. This is suppose to help clean the piece and maybe loosen the jet. Have fun wrenching.
|
|
#13
07-21-2009, 01:03 PM
|
||||
|
||||
|
I finally got the main rod unstuck from the jet. now the issue is It does not like to stay seated in the adjuster screw. I tried scraping it with a screw driver just to get it to have a little bur to bite onto, but everytime I seated it, it would just stick in the main jet. I finally was able to set it but still want to fix it. I am thinking if I get some flux I might be able to solder it. I will just have to make sure that it does not block the passage.
After driving it around the yard a little I noticed more problems. The hydrostatic drive is all over the place. it speeds up and down a lot and the lever will always move to back to reverse. Also the lever kinda sticks when tyring to reverse. I think I need to look into the linkage and verify nothing is binding. Does the hydrostatic drive still have a clutch? I pushed the clutch/brake pedal all the way down and I was not getting any braking action and the tractor wanted to still reverese. I guess I need to look into more of the linkage. There is a lot of other issues but I am gonna try and stay focussed on solving one thing at a time.
|
|
#14
07-21-2009, 05:05 PM
|
||||
|
||||
|
Quote:
I wish you could post a picture of just what you have as far as the main jet adjusting needle (high speed needle). I can't tell from your description if your needle broke at the top or if it's still in one piece. If the needle is sticking in the main jet... that's what it slides into and can be seen when you remove the bowl retaining nut, you need to remove the main jet and clean it out. I really have to say don't solder anything on the carburetor. You will regret it in time and money. One of the things I had to get use to driving a hydro was slowing down. I'm use to using a brake to slow down then stop. Well I was breaking my neck. I can't be of much help with your hydro. I only have one and am blessed that it works as it should. There are many here who swear by them and have much experience with them. But just between you me and the oak tree I freaked out when you said you were going to solder the high speed needle. Keep wrenching and having fun with you Cub.
|
|
#15
07-21-2009, 06:44 PM
|
||||
|
||||
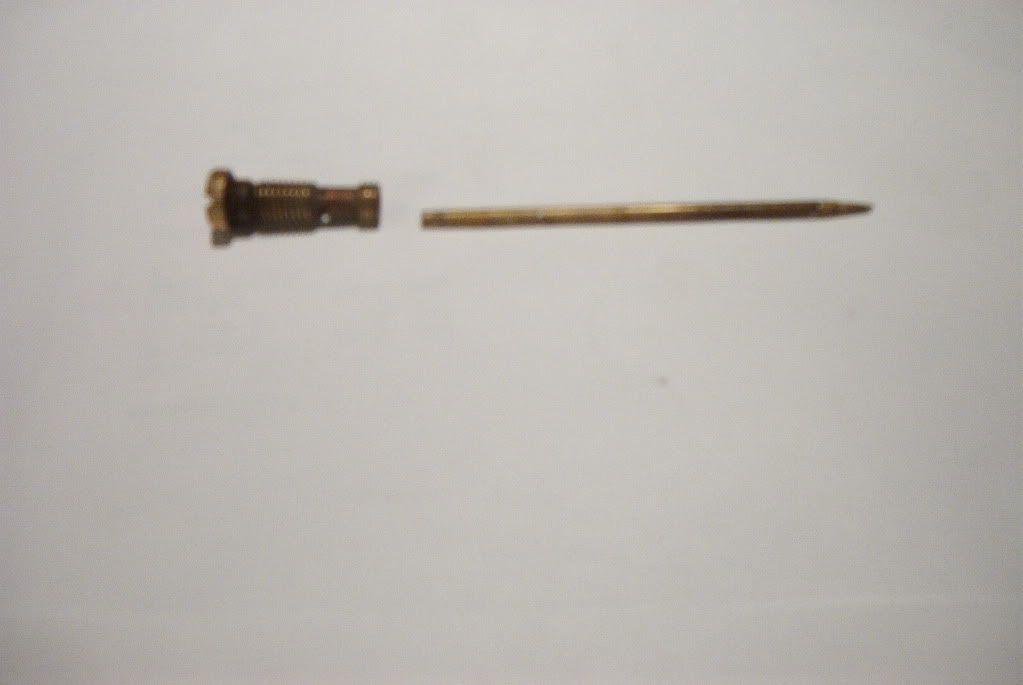 Unfortunately I have a very old digital camera and it did not want to focus. But the metering rod slides about a 1/4inch into the adjuster screw (you can kinda make out the wear mark on the rod). I imagine that this is a size for size or 0.001" interference fit when theses two parts were created. A slight interference fit would allowing them to stay together. But some how over the years either it has loosened up or maybe someone took it apart, but I just don't have enough interference to keep the two piece together. I can pull it apart with just a little bit of force. Thats why I scrapped a screwdriver on the metering rod interference surface hoping to cause a few burrs that will act as a neural and create an interference between the two. My thought on solder was to use the same technique as sweating a pluming pipe. Clean the end of the rod, put some flux on just the end, then install it into the adjuster screw, then heat the two pieces until the solder flows in between. And obviously check that it did not block the center passage.
|
|
#16
07-21-2009, 10:42 PM
|
||||
|
||||
|
punkid,
Hey.. Your picture is fine. I admire the problem. I just don't see (which means nothing) how you can sweat it in and not clog it up. If it don't work you can always pick one up. I think they go for 12-15 bucks. Thanks for the picture.
|
|
#18
07-23-2009, 09:05 AM
|
||||
|
||||
|
Well Against your recommendation I did solder the main rod to adjuster screw. And in all honestly it worked really well, just a quick sanding, little bit of flux, some heat, and just a tiny bit of solder. I blew through some of the passages and it seamed clear. Anyways I will be buying a new one, as well as a carb gasket kit, but I wanted to wait till late fall, I figure by then I will have a bigger list of parts and I can get them all at the same time.
I mowed the lawn yesterday for the first time ever with it. And I was not really prepared for the RPM that the mower deck runs at. I seriously almost jumped off the thing when I engaged it. But after getting use to it I started mowing. It did a really good job actually better then my old 28" snapper, and better then my neighbors newer craftsmen rider. So I was very happy. Thy hydro lever still needs to be adjusted so i don't have to constantly maintain speed with my fingers Some other points of interest. I tightened up the steering linkage, previous owner could not get the nut tight, probably because he was trying to thread a coarse thread nut onto a fine thread stud.  I also installed two bolts that hold the rear-end onto the frame, they were missing. I tried to adjust the brakes but I wanted to let some PB blaster set in on those adjusting rods. I also think I got the SG charging but I am not 100%. what voltage should it be putting out? I am use to an alternator that would be well over 13.5v. I checked a bit while running but it was not a good test because the battery was fresh off a battery charger. but after mowing the whole lawn the battery was still reading 12.56 so it makes me think it either uses very little electricity or the battery was being charged. The amp meter is out of adjustment, zero is a little to the left so its tough to tell if its positive or negative. I also installed two bolts that hold the rear-end onto the frame, they were missing. I tried to adjust the brakes but I wanted to let some PB blaster set in on those adjusting rods. I also think I got the SG charging but I am not 100%. what voltage should it be putting out? I am use to an alternator that would be well over 13.5v. I checked a bit while running but it was not a good test because the battery was fresh off a battery charger. but after mowing the whole lawn the battery was still reading 12.56 so it makes me think it either uses very little electricity or the battery was being charged. The amp meter is out of adjustment, zero is a little to the left so its tough to tell if its positive or negative.Thats all I got for now, Thanks for listening 
|
|
#19
07-23-2009, 11:09 AM
|
||||
|
||||
|
punkid,
I also think I got the SG charging but I am not 100%. Disconnect the field wire from the S/G. Now with the tractor running touch the field wire to ground. If it is working you will hear it load up. A couple of mine stay on the charge side on the amp meter. And I feel good that all is well. I put new brushes in another after cleaning it with an electrical degreaser (CRT) and when I start it up the meter jumps to a hard charge. Just about pegs the meter. This only lasts for about 10 seconds. Then it drops down to an almost center position on the meter. Glad to hear you got her working. Have fun with your hard work. That's the pay-off.
|
|
|
|
Cub Cadet is a premium line of outdoor power equipment, established in 1961 as part of International Harvester. During the 1960s, IH initiated an entirely new line of lawn and garden equipment aimed at the owners rural homes with large yards and private gardens. There were a wide variety of Cub Cadet branded and after-market attachments available; including mowers, blades, snow blowers, front loaders, plows, carts, etc. Cub Cadet advertising at that time harped on their thorough testing by "boys - acknowledged by many as the world's worst destructive force!". Cub Cadets became known for their dependability and rugged construction.
MTD Products, Inc. of Cleveland, Ohio purchased the Cub Cadet brand from International Harvester in 1981. Cub Cadet was held as a wholly owned subsidiary for many years following this acquisition, which allowed them to operate independently. Recently, MTD has taken a more aggressive role and integrated Cub Cadet into its other lines of power equipment.
This website and forum are not affiliated with or sponsored by MTD Products Inc, which owns the CUB CADET trademarks. It is not an official MTD Products Inc, website, and MTD Products Inc, is not responsible for any of its content. The official MTD Products Inc, website can be found at: http://www.mtdproducts.com. The information and opinions expressed on this website are the responsibility of the website's owner and/or it's members, and do not represent the opinions of MTD Products Inc. IH, INTERNATIONAL HARVESTER are registered trademark of CNH America LLC
All material, images, and graphics from this site are the property of www.onlycubcadets.net. Any unauthorized use, reproductions, or duplications are prohibited unless solely expressed in writing.
Cub Cadet, Cub, Cadet, IH, MTD, Parts, Tractors, Tractor, International Harvester, Lawn, Garden, Lawn Mower, Kohler, garden tractor equipment, lawn garden tractors, antique garden tractors, garden tractor, PTO, parts, online, Original, 70, 71, 72, 73, 76, SO76, 80, 81, 86, 100, 102, 104, 105, 106, 107, 108,109, 122, 123, 124, 125, 126, 127, 128, 129, 147, 149, 169, 182, 282, 382, 482, 580, 582, 582 Special, 680, 682, 782, 782D, 784, 800, 805, 882, 982, 984, 986, 1000, 1015, 1100, 1105, 1110, 1200, 1250, 1282, 1450, 1512, 1604, 1605, 1606, 1610, 1615, 1620, 1650, 1710, 1711, 1712, 1806, 1810, 1811, 1812, 1912, 1914.


 Linear Mode

