
|
PLEASE PATRONIZE OUR SPONSORS!


|
|||||||
 |
|
|
Thread Tools | Display Modes |
|
#1
 02-15-2012, 08:05 PM
|
||||
|
||||
|
Today was quite productive. I was able to get my front to rear hose split installed on the BRS. I purchased the kit from xtrememotorworks.com and it was as everything they sell, great quality and well put together and thought out. All of the T-s and adapters and connections were there. The only thing I might tell someone with a Super that is interested in the kit is to get the original kit with 48" hoses instead of getting the 60" inch hoses that Aaron suggested to use on the 1572. There was more than a foot of hose left on each hose to have to route, curve and zip tie, to keep from having things rub or hit the hoses. Also my Cat 0 plate did not have holes pre-drilled for the female couplers. Luckily Aaron sends a plate already drilled for the connectors in the kit to be used on the frame in the same fashion as spring assist kits. The problem I ran into was that I drilled my Cat 0 plate thinking I could just slide the connectors into the holes and use the snap rings to hold them in place. Well the Cat 0 plate is twice as think as the included plate Aaron sends meaning that I couldn't put the snap rings onto the connectors. After some head scratching my buddy and I decided it was actually better that they wouldn't work that way due to the fact it would be near impossible to tighten the fittings and hoses and install the snap rings. We decided to use Aaron's plate and weld it to the Cat 0 frame directly in line with where we had drilled the holes. This let the lines come out to reach the female connectors allowing a wrench easy access to tighten each line and connector tightly. Also the snap rings were a "snap"
 to install. The rest of the install was actually the easiest part of all of this. Simply follow Aaron's directions and pictures and it is pretty much plug and go. The top connector on the control valve had to be rerouted a bit differently than his directions due to more involved wired and cables with the diesel. Also his directions used a 782 if I am not mistaken and looked to have a bit more room to work with in hose routing. I tried to take enough pictures, but am sure I could have done much better. All in all it is something most anyone can do especially if you don't have a Cat 0 plate. If you do have that plate, then you can either do the modification that we did or I am sure someone here can come up with and even better mounting solution. This just happened to work for use as we had all the tools needed including a mig. Also we ran the hoses from the back to the front doing the bottom hose connection first then doing the top hose connection. to install. The rest of the install was actually the easiest part of all of this. Simply follow Aaron's directions and pictures and it is pretty much plug and go. The top connector on the control valve had to be rerouted a bit differently than his directions due to more involved wired and cables with the diesel. Also his directions used a 782 if I am not mistaken and looked to have a bit more room to work with in hose routing. I tried to take enough pictures, but am sure I could have done much better. All in all it is something most anyone can do especially if you don't have a Cat 0 plate. If you do have that plate, then you can either do the modification that we did or I am sure someone here can come up with and even better mounting solution. This just happened to work for use as we had all the tools needed including a mig. Also we ran the hoses from the back to the front doing the bottom hose connection first then doing the top hose connection.Below are the pictures I took: Bottom valve control connection should be done first 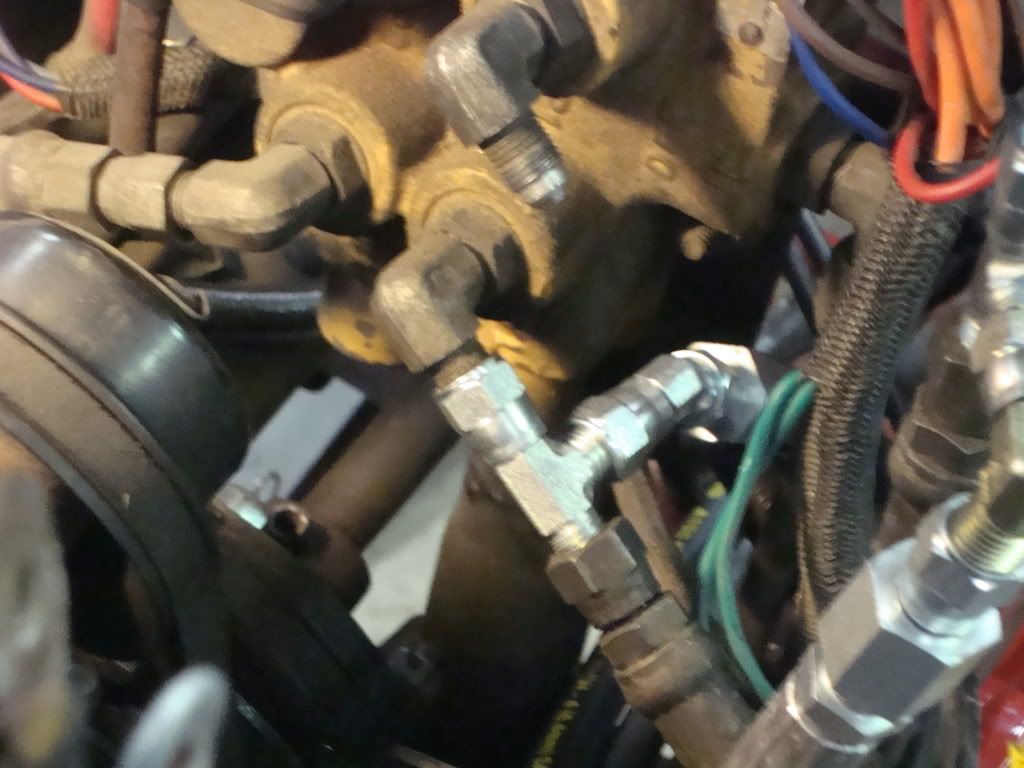 Top hose connection. Note that the new hose is routed to the front of the old hose to allow the T connector to not be in a bind. 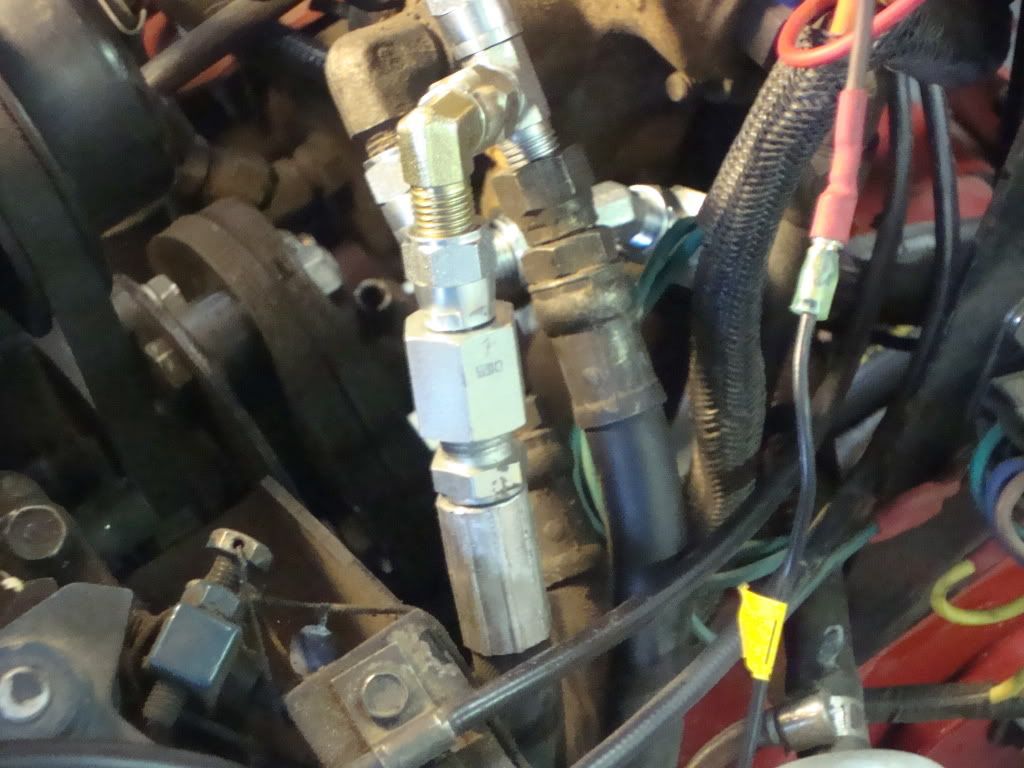 We noticed there was not enough room with the lift arm shaft behind the plate to drill the holes one on top of the other, so we drilled side by side. After drilling is when we found out the female connectors were to short to be held in place with the snap rings. 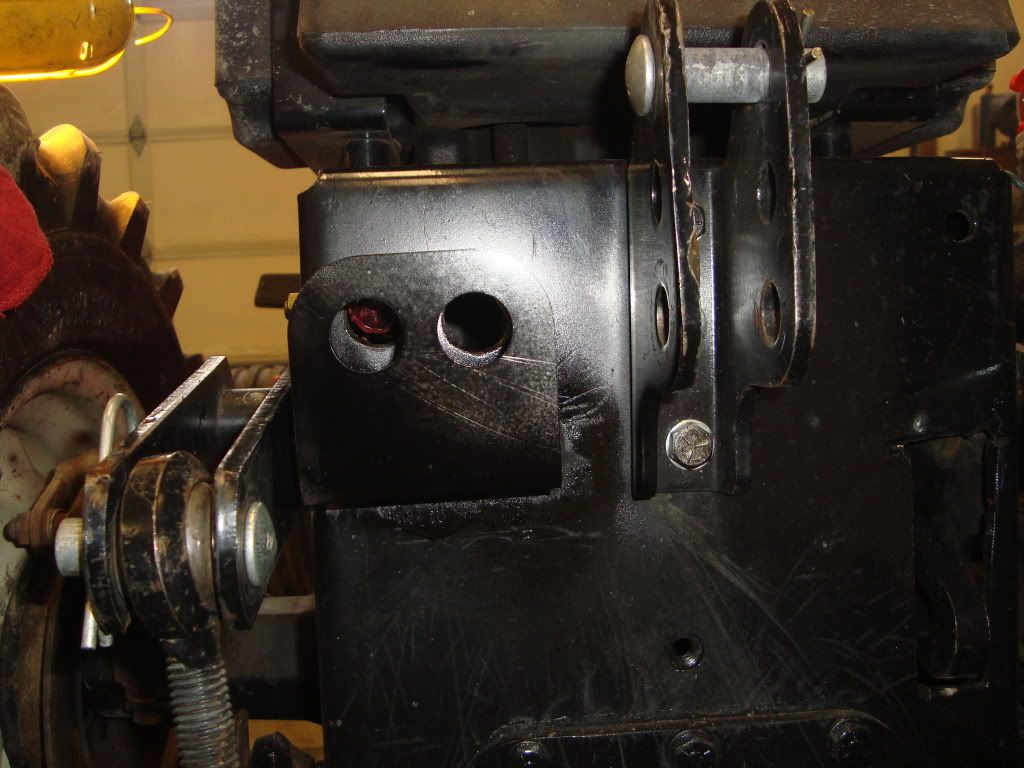 Aaron's attachment plate welded to the Cat 0 plate to make the connector installation much easier and to allow easier removal and or maintenance. 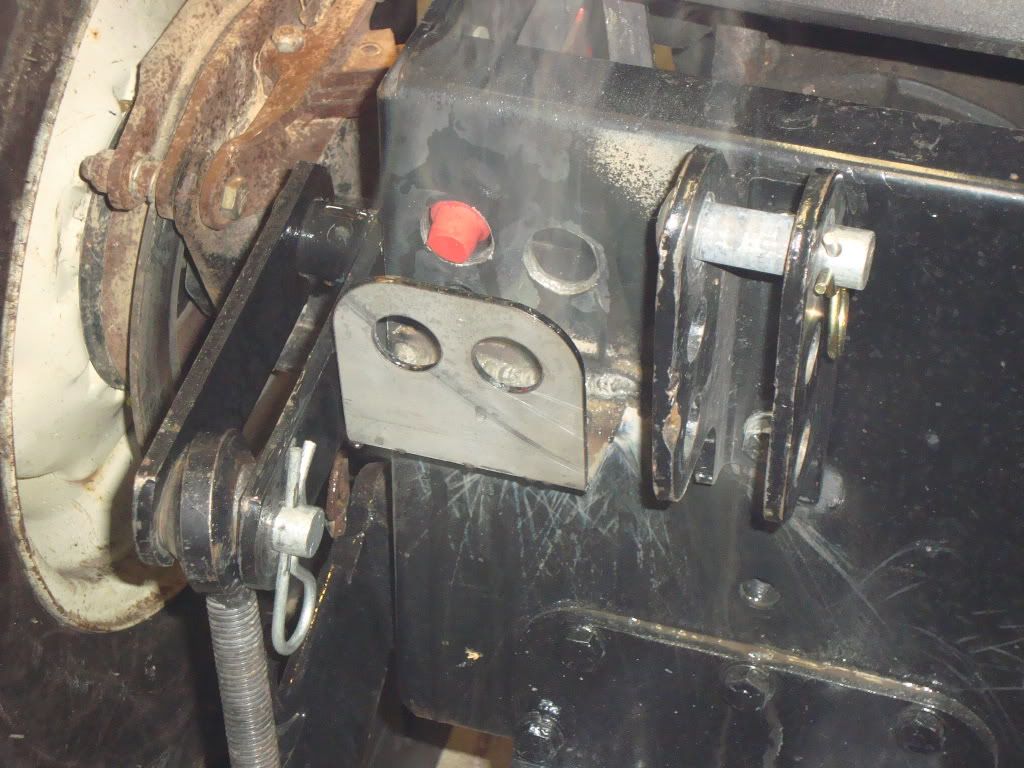 The finished and painted attachment plate and connectors and hoses installed. 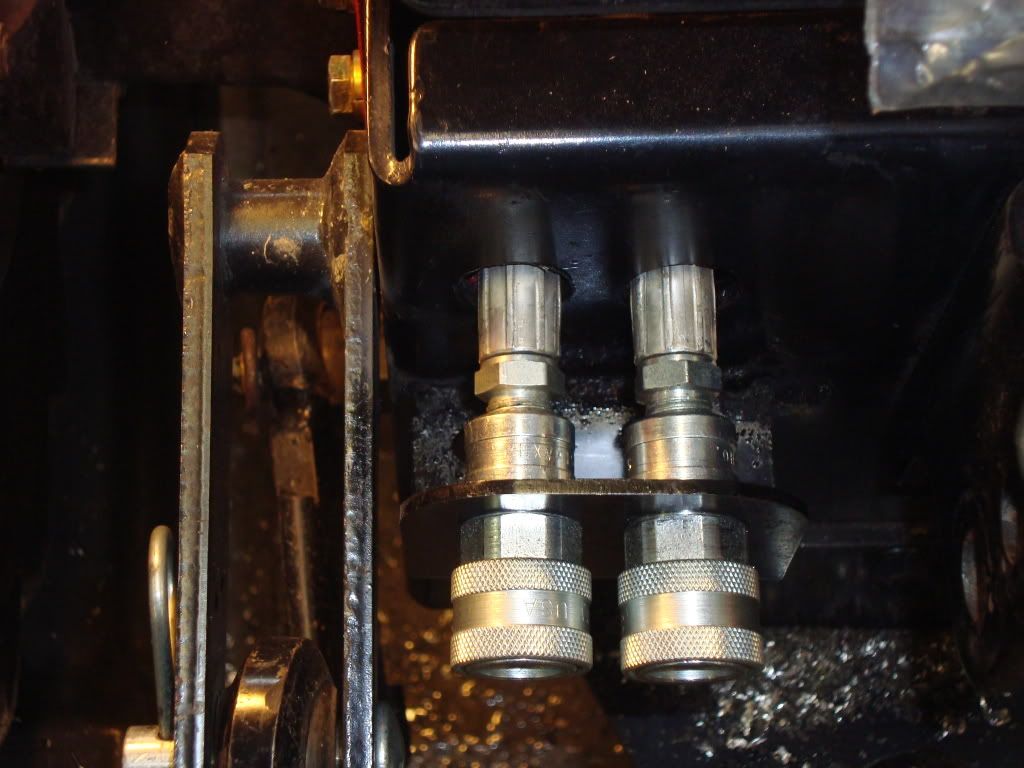 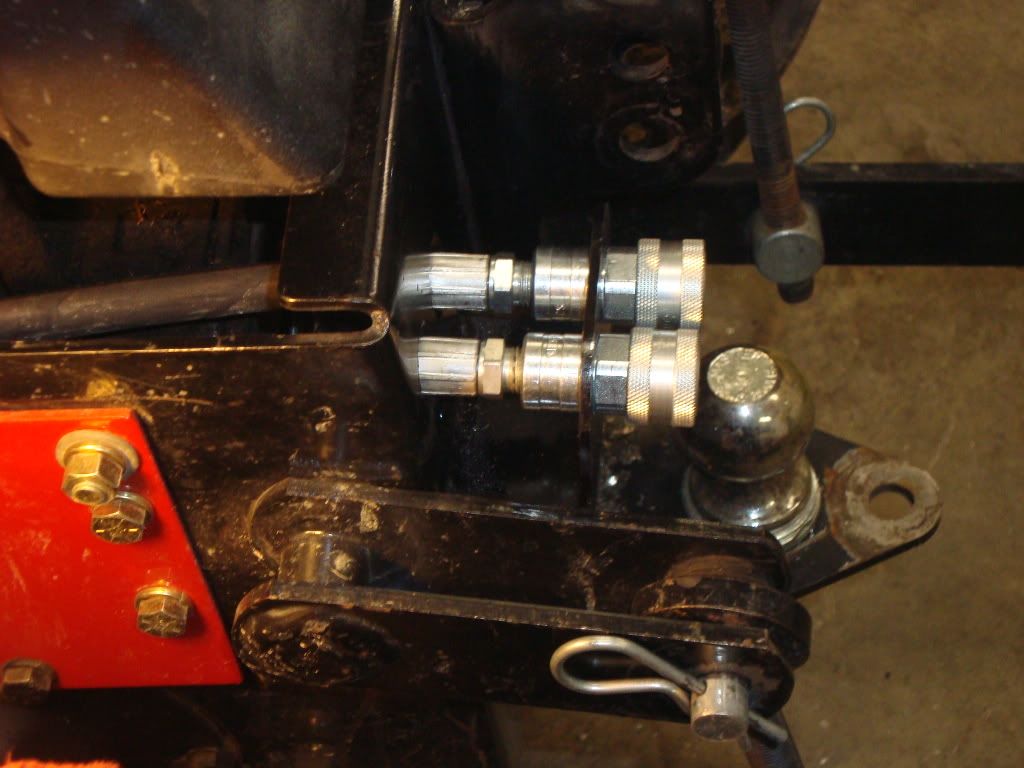 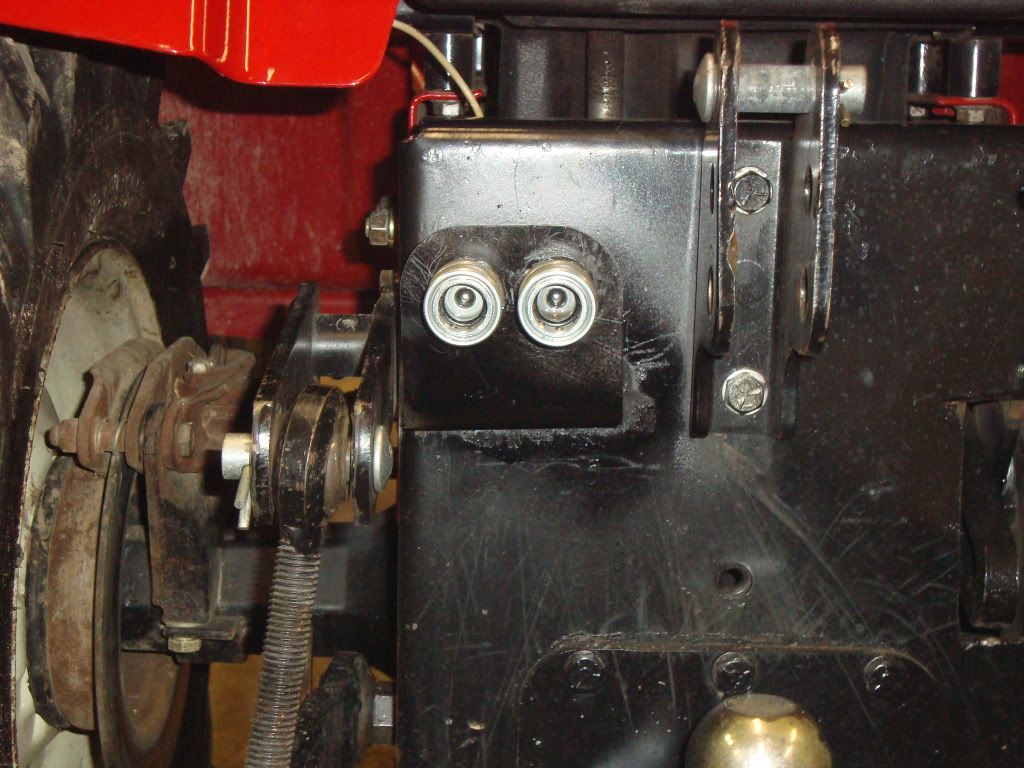
__________________
DWayne 1973: 128, ag tires, 3pt. lift, spring assist, lights, 42" Deck 10" moldboard plow 2016 XT1 42" deck 18HP 
|
|
#2
02-15-2012, 08:12 PM
|
||||
|
||||
|
WOW DWayne, looks darn good from this end.
Hang the "PLUMBING" sign out front of your shop, nice clean job 
__________________
Make the best of each day , Todd  Original's Face Lift thread.http://www.onlycubcadets.net/forum/s...ad.php?t=34439 (O) Start to Finish video.https://www.youtube.com/watch?v=GAoUNNiLwKs Wheel Around videohttps://www.youtube.com/watch?v=XUL-m6Bramk They can't all be turn key! 
|
|
#3
02-15-2012, 08:13 PM
|
||||
|
||||
|
Looks great Dwayne! It will be nice to use that disc with it.
__________________
1971 128,3pt,ags,rebuilt motor,headlights 1988 1812,dual ports 1966 122,creeper,3pt,ags,sa,headlights,restored 1st place at RPRU 2013 1966 123,3pt,brinly spring assist 1973 108 1968 125 Attachments:QA36A,wfblade,2 nf blades,brinly disc,a cultivator,plow,homemade wrecker boom with 2000lbs winch,ih weights,50lbs weights,2IH windbreakers
|
|
#4
02-15-2012, 09:18 PM
|
||||
|
||||
|
Quote:
Quote:
__________________
DWayne 1973: 128, ag tires, 3pt. lift, spring assist, lights, 42" Deck 10" moldboard plow 2016 XT1 42" deck 18HP
|
|
#5
02-15-2012, 10:38 PM
|
||||
|
||||
|
You make me want to put that set up on the 2086 even more now.
Great job to you and your friend. 
__________________
102-P Narrow tires no creeper--42inch deck and IH blade. 102-D Wide tires,creeper,headlights--42inch deck and CW36 snow thrower. 1997-2086 Super with 3 point hitch and all the bells and whistles. 1961-PTE-"O", needs lots of work. 2072-Repowered with a ch18, Woods tractor. 149 with my Dad. 44" deck and QA36A. #9-70 with weights and sleeve hitch. #10-149 with a 38inch deck. 2015 Kubota BX 2670.
|
|
#6
02-15-2012, 10:42 PM
|
||||
|
||||
|
Quote:
Go get it. I don't think you will have a problem installing it. If I can do it pretty much anyone can. I think in actual working time not including BS time, it might have taken about 2-3 hours. The hardest part was removing the panels and tin for accessibility.
__________________
DWayne 1973: 128, ag tires, 3pt. lift, spring assist, lights, 42" Deck 10" moldboard plow 2016 XT1 42" deck 18HP
|
|
#8
02-15-2012, 11:36 PM
|
||||
|
||||
|
I would Dwayne BUT I'm looking at another
 so $$$ is going to another project for now. so $$$ is going to another project for now.
__________________
102-P Narrow tires no creeper--42inch deck and IH blade. 102-D Wide tires,creeper,headlights--42inch deck and CW36 snow thrower. 1997-2086 Super with 3 point hitch and all the bells and whistles. 1961-PTE-"O", needs lots of work. 2072-Repowered with a ch18, Woods tractor. 149 with my Dad. 44" deck and QA36A. #9-70 with weights and sleeve hitch. #10-149 with a 38inch deck. 2015 Kubota BX 2670.
|
|
#9
02-15-2012, 11:39 PM
|
||||
|
||||
|
Quote:
Quote:
__________________
DWayne 1973: 128, ag tires, 3pt. lift, spring assist, lights, 42" Deck 10" moldboard plow 2016 XT1 42" deck 18HP
|
|
#10
02-15-2012, 11:56 PM
|
||||
|
||||
|
Hi DWayne,
Thats a very nice job you guys have done on BRS. From looking at the photos, does your 3 point frame mount go behind the frame or on top of the frame? my 1882 had the 3 point on it when I got it. It came with the 3 point manual as well, and the brackets are on the outside of the frame. When I installed the 3 point on my 1572 I installed it as shown on the outside of the frame. Should the frame be on the outside of the 3 point mounts? and would this make a difference. Thanks, Mike
__________________
1991 1882
|
|
|
|
Cub Cadet is a premium line of outdoor power equipment, established in 1961 as part of International Harvester. During the 1960s, IH initiated an entirely new line of lawn and garden equipment aimed at the owners rural homes with large yards and private gardens. There were a wide variety of Cub Cadet branded and after-market attachments available; including mowers, blades, snow blowers, front loaders, plows, carts, etc. Cub Cadet advertising at that time harped on their thorough testing by "boys - acknowledged by many as the world's worst destructive force!". Cub Cadets became known for their dependability and rugged construction.
MTD Products, Inc. of Cleveland, Ohio purchased the Cub Cadet brand from International Harvester in 1981. Cub Cadet was held as a wholly owned subsidiary for many years following this acquisition, which allowed them to operate independently. Recently, MTD has taken a more aggressive role and integrated Cub Cadet into its other lines of power equipment.
This website and forum are not affiliated with or sponsored by MTD Products Inc, which owns the CUB CADET trademarks. It is not an official MTD Products Inc, website, and MTD Products Inc, is not responsible for any of its content. The official MTD Products Inc, website can be found at: http://www.mtdproducts.com. The information and opinions expressed on this website are the responsibility of the website's owner and/or it's members, and do not represent the opinions of MTD Products Inc. IH, INTERNATIONAL HARVESTER are registered trademark of CNH America LLC
All material, images, and graphics from this site are the property of www.onlycubcadets.net. Any unauthorized use, reproductions, or duplications are prohibited unless solely expressed in writing.
Cub Cadet, Cub, Cadet, IH, MTD, Parts, Tractors, Tractor, International Harvester, Lawn, Garden, Lawn Mower, Kohler, garden tractor equipment, lawn garden tractors, antique garden tractors, garden tractor, PTO, parts, online, Original, 70, 71, 72, 73, 76, SO76, 80, 81, 86, 100, 102, 104, 105, 106, 107, 108,109, 122, 123, 124, 125, 126, 127, 128, 129, 147, 149, 169, 182, 282, 382, 482, 580, 582, 582 Special, 680, 682, 782, 782D, 784, 800, 805, 882, 982, 984, 986, 1000, 1015, 1100, 1105, 1110, 1200, 1250, 1282, 1450, 1512, 1604, 1605, 1606, 1610, 1615, 1620, 1650, 1710, 1711, 1712, 1806, 1810, 1811, 1812, 1912, 1914.


 Linear Mode

