
|
PLEASE PATRONIZE OUR SPONSORS!


|
|||||||
 |
|
|
Thread Tools | Display Modes |
|
#1
 01-15-2021, 02:02 PM
|
|||
|
|||
|
So I'm about to lose my dang mind here with my mechanical PTO.
When engaged, there should be a 1/64th-3/64th inch gap between the wear button on the PTO lever and the thrust button in the PTO, per the instructions on the very last poorly xerox'd page here: http://cubfaq.com/mechanical_pto.html I've adjusted it so that when it sits in the "PTO engaged" position that I can barely slide a .001in feeler gauge between the buttons. When I disengage the PTO the buttons touch. When I start the tractor with the PTO disengaged, the PTO begins running the moment I crank the engine. Nuts! OK so I adjust the arm closer to ensure the buttons are snugly engaged. Now the PTO stays disengaged when in the disengaged position. It engages when commanded to, but now the buttons are touching while the PTO is engaged. 5 minutes into a snowblowing run and the PTO starts grinding and warbling something fierce, like a blender gone bananas. I hop off and check and the wear button is worn away, and the thrust button is throwing sparks off the metal engagement arm. Nuts! What the hell do I need to adjust and how do I adjust it once I get my new wear button delivered? All this and tomorrow we're due for 6 inches of snow. Guess the snow thrower will have to act as a snow plow temporarily. 
|
|
#2
01-15-2021, 02:23 PM
|
||||
|
||||
|
When the PTO is disengaged but you don't have an implement attached to it, the PTO will still spin with the engine. That's just how it is. If there's a belt around the PTO to power a mower deck or snowblower, the belt will hold the PTO in place and it won't spin.
Now if there IS a belt around the PTO and it STILL spins even when disengaged, then the PTO must be adjusted a bit too tight. It is adjustable but you'll need to remove it from the tractor to adjust it. The PTO functions in a simple way: When engaged, The triangular spring and that center thrust button apply spring pressure to those three plates on the front of the PTO. That pressure is then transferred to the three screws, which have nuts on the end, and they squeeze the end plate in towards the main PTO body. This then applies pressure to the drive disk in between the end plate and main body, thus engaging the PTO. When released, spring pressure is relieved from the screws, and three small springs that slip over the screws inside the body push the end plate apart slightly, thus disengaging the PTO. In the diagram below you should have either style #2 or #3. 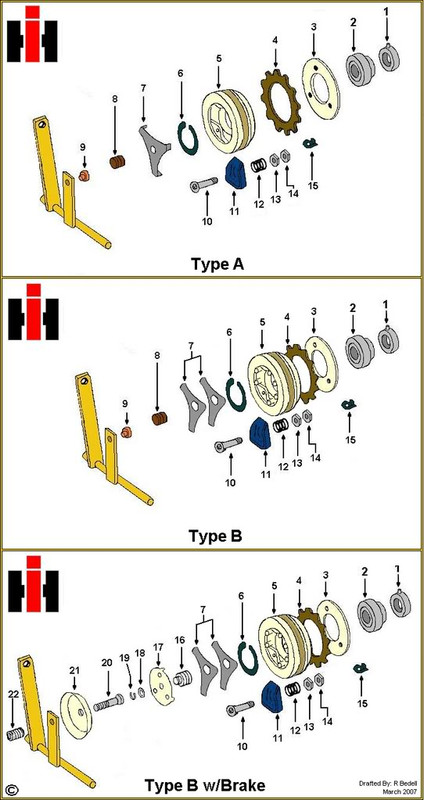 To adjust the PTO, the nuts on the end of the three screws must me either loosened or tightened. In your case they need to be loosened. There's a total of 6 nuts (2 on each screw). The inner one is the actual adjustment and the outer one holds the inner one in place. They are often a pain to loosen, ask me how I know  . There is a specific tool to adjust them but because I don't have the tool I had to do with feel. When I adjusted mine I found it was best to tighten all the nuts until they just put a bit pressure on the screws, making sure that they all do because sometimes you can have two tight but one is loose. You don't want any of them loose, they should not be able to turn freely. I ended up with a good, properly functioning PTO even without the adjustment tool, but I would recommend you get your hands on the Wide frame clutch adjusting tool because it will be a lot easier. . There is a specific tool to adjust them but because I don't have the tool I had to do with feel. When I adjusted mine I found it was best to tighten all the nuts until they just put a bit pressure on the screws, making sure that they all do because sometimes you can have two tight but one is loose. You don't want any of them loose, they should not be able to turn freely. I ended up with a good, properly functioning PTO even without the adjustment tool, but I would recommend you get your hands on the Wide frame clutch adjusting tool because it will be a lot easier.It's not easy to explain without showing it but unfortunately I don't have any pictures. (edit: changed "bolts" to "nuts". My mistake)
__________________
 '70 107 with k301 engine swap '71 106 with 38" deck '70 147R with factory replacement k321, 42" deck '61 Original with 38" timed deck '63 70 "pinkie" 1863 with 54" deck '46 Farmall H, '50 Farmall Cub 105 x2 (parts)
|
|
#3
01-15-2021, 03:00 PM
|
|||
|
|||
|
6 nuts.....NOT 6 bolts
Note: the OP probably has a lot of slop (worn/elongated holes in pivot points comes to mind) in wear points in the total linkage setup. Jam nuts, both left hand and right hand on the turnbuckle will help a lot IMHO
|
|
#4
01-15-2021, 04:08 PM
|
|||
|
|||
|
"To adjust the PTO, the nuts on the end of the three screws must me either loosened or tightened. In your case they need to be loosened. There's a total of 6 nuts (2 on each screw). The inner one is the actual adjustment and the outer one holds the inner one in place. They are often a pain to loosen, ask me how I know
. There is a specific tool to adjust them but because I don't have the tool I had to do with feel. It's not easy to explain without showing it but unfortunately I don't have any pictures." So I have Type B in your pictures. Are you saying I need to adjust the bolts (13 and 14) on the backside of the PTO screws labeled #10 in the diagram? I have that specific adjustment tool and the distance is set to spec per the manual instructions. :/ Essentially you're saying by loosening the bolts on the the three fingers off a little, the thrust button should come out a little? Won't that make the whole thing harder to disengage? And yes, lots of slop in the linkages, to include the PTO lever and all the linkages to the thrust arm. At one point I had it running, but only when I pulled the lever towards me about an inch and held it there right on the cusp of the engaged/disengaged point.
|
|
#5
01-15-2021, 04:15 PM
|
||||
|
||||
|
That would be my thinking, just slightly. It's not the screws themselves but the 6 nuts on the back of them that get adjusted. They are # 13 and 14.
As Finsruskw stated though, there could also be play in the linkage from the PTO lever to the actual PTO. As I mentioned briefly before, did you have anything mounted to the PTO when you were testing your first adjustment? If there isn't a belt wrapped around it the PTO will still spin with the engine just because of the laws of motion. Not a recommended test but if it works properly you should be able to grab it while the engine is running and it will stop. Or press something like a wood block against it.
__________________
'70 107 with k301 engine swap '71 106 with 38" deck '70 147R with factory replacement k321, 42" deck '61 Original with 38" timed deck '63 70 "pinkie" 1863 with 54" deck '46 Farmall H, '50 Farmall Cub 105 x2 (parts)
|
|
#6
01-15-2021, 04:30 PM
|
|||
|
|||
|
I've got my snowthrower on there and when I fired it up the first time the thrower started turning as the engine cranked over.
The second time I had no play and the linkages were tight cause it was mashed up against the thrust button.
|
|
#7
01-15-2021, 06:03 PM
|
||||
|
||||
|
With a good button on the PTO, a good button on the release arm, the PTO assembled and adjusted properly, I generally adjust the turnbuckle on the engagement lever to where I can spin the clutch by hand without it grabbing. I don't get to concerned about the gap clearance between the 2 ware buttons. If that doesn't work, then something is likely not quite right within the clutch assembly. Is the bearing in the clutch free spinning and not grabbing ?
|
|
#9
01-16-2021, 06:59 AM
|
|||
|
|||
|
Quote:
__________________
Roland Bedell CC Models: 100, 105, 1450, 782, (2) 784, & 2072 Buy: Made in the USA 
|
|
#10
01-16-2021, 07:39 AM
|
||||
|
||||
|
Maybe the PTO needs rebuilding. The springs goes bad and the disc becomes worn. A worn PTO, there can be lack of adjustment capability.
The PTO bearing could be bad or it could be wrong position on crankshaft. It should be flush with end of the crankshaft. Bill
__________________
Two 125's and a 124 all with 42" decks Plow blade #2 Cart QA36 snowthower
|
|
|
|
Cub Cadet is a premium line of outdoor power equipment, established in 1961 as part of International Harvester. During the 1960s, IH initiated an entirely new line of lawn and garden equipment aimed at the owners rural homes with large yards and private gardens. There were a wide variety of Cub Cadet branded and after-market attachments available; including mowers, blades, snow blowers, front loaders, plows, carts, etc. Cub Cadet advertising at that time harped on their thorough testing by "boys - acknowledged by many as the world's worst destructive force!". Cub Cadets became known for their dependability and rugged construction.
MTD Products, Inc. of Cleveland, Ohio purchased the Cub Cadet brand from International Harvester in 1981. Cub Cadet was held as a wholly owned subsidiary for many years following this acquisition, which allowed them to operate independently. Recently, MTD has taken a more aggressive role and integrated Cub Cadet into its other lines of power equipment.
This website and forum are not affiliated with or sponsored by MTD Products Inc, which owns the CUB CADET trademarks. It is not an official MTD Products Inc, website, and MTD Products Inc, is not responsible for any of its content. The official MTD Products Inc, website can be found at: http://www.mtdproducts.com. The information and opinions expressed on this website are the responsibility of the website's owner and/or it's members, and do not represent the opinions of MTD Products Inc. IH, INTERNATIONAL HARVESTER are registered trademark of CNH America LLC
All material, images, and graphics from this site are the property of www.onlycubcadets.net. Any unauthorized use, reproductions, or duplications are prohibited unless solely expressed in writing.
Cub Cadet, Cub, Cadet, IH, MTD, Parts, Tractors, Tractor, International Harvester, Lawn, Garden, Lawn Mower, Kohler, garden tractor equipment, lawn garden tractors, antique garden tractors, garden tractor, PTO, parts, online, Original, 70, 71, 72, 73, 76, SO76, 80, 81, 86, 100, 102, 104, 105, 106, 107, 108,109, 122, 123, 124, 125, 126, 127, 128, 129, 147, 149, 169, 182, 282, 382, 482, 580, 582, 582 Special, 680, 682, 782, 782D, 784, 800, 805, 882, 982, 984, 986, 1000, 1015, 1100, 1105, 1110, 1200, 1250, 1282, 1450, 1512, 1604, 1605, 1606, 1610, 1615, 1620, 1650, 1710, 1711, 1712, 1806, 1810, 1811, 1812, 1912, 1914.


 Linear Mode

