
|
PLEASE PATRONIZE OUR SPONSORS!


|
|||||||
 |
|
|
Thread Tools | Display Modes |
|
#31
 06-26-2011, 10:13 AM
|
||||
|
||||
|
Quote:
eek - grinding valves...sounds a little scary to me. I used to own a precision turning company, so I'm a little leery of taking a relatively precise angle on a round piece of metal to a grinding wheel. I think I lack the right tools for such a job. Maybe I should take them to someone local to have them done, but if I did, shouldn't the seats be ground to match as well? I think that spot you're talking about in the piston is its identifying notch. I read that it was manufactured that way, to designate that side toward the flywheel. I certainly didn't do that in my cleaning!  In fact, the little spot I hit with the wheel is really not even visible in the pics. I stopped sweating that 30 seconds after I mentioned it... In fact, the little spot I hit with the wheel is really not even visible in the pics. I stopped sweating that 30 seconds after I mentioned it...I have been cleaning out the fins since that picture. Shortly after I get it put back together for a test run, the motor's coming all the way out, so I'll really clean it then. What's the best way to clean up those fins anyway? Can you get them back to smooth and shiny (vs rusty and ugly?) Good advice on the controls and muffler brace. I'll fabricate one for it. I don't think that aluminum was cracked, but I'll take a look at it. Thanks Matt G! And thanks for the compliment Methos. I try to be thorough because the instructional stuff with pics has been so helpful for me. 
|
|
#32
06-26-2011, 01:35 PM
|
||||
|
||||
|
That isn't quite what I meant. No power tools are necessary- use valve grinding compound. Remove the keepers and springs, pull the valve out, put some of the valve grinding compound on the sealing surface of the valve (making absolutely certain you don't get any at all on the stem or in the guide) and then put it back in place. Rotate it back and forth through 90 degrees a few times while applying light downward pressure, turn it one direction 90 degrees, then back and forth again, then rotate it another 90 degrees, etc until you've gone all the way around in a circle. (If that's confusing let me know and I'll try again) Pull the valve back out, clean off all of the valve grinding compound with a rag. If you have a uniform shiny circle on both the valve and the seat, you're done- clean off any remaining valve grinding compound with a rag and mineral spirits, and re-lube the valve stem. Once again, make sure you didn't get any valve grinding compound on the stem or in the guide, or you'll need new valves and guides in a hurry. Do that to both valves, reset the valve lash, and you'll be all set.
What I usually do to clean my engines is use degreaser and a water hose, putty knife, brush, etc. after removing all tinwork and duct-taping over the carb, exhaust, and breather so I don't get water in the engine, and then I just scrub it until I'm satisfied with its cleanliness. You can also pressure wash it if you are careful to stay away from crank seals, the breather, and anything electrical. You are pretty much stuck with the rust; if you were to get it down to shiny metal, it would rust again in a hurry from the heat generated by the engine when it is running. As long as you get the dirt and grease out of there, everything will be fine. Bare iron would transfer heat the best, but it won't stay bare, so you'll just have to live with the rust, or clean it all off and paint it with high-temp paint, which would probably be hard unless you tore the motor completely down and had the block hot-tanked or something. Anything is better for cooling that dirt mixed with cooked-on oil, so whatever cleaning you can do will be an improvement, nonetheless.
|
|
#33
06-26-2011, 10:02 PM
|
||||
|
||||
|
Ah, yeah. I did read about that valve procedure Matt (probably on your site.)
I think I'll do it, since I want to pull those valves out and clean a little more anyway.I'm going to pick up a good brush to get into those fins tomorrow. I can't think of anything I have that would be suitable.
|
|
#34
06-26-2011, 10:17 PM
|
||||
|
||||
|
Just realized I never got a pic of the head after the oven cleaner. I let it soak for 20 minutes or so, then scrubbed again with a little fine steel wool. I still have some work to do on the gasket surfaces, including the glass / sandpaper bit.
Here's a before and after to remember how it looked when I took it off: 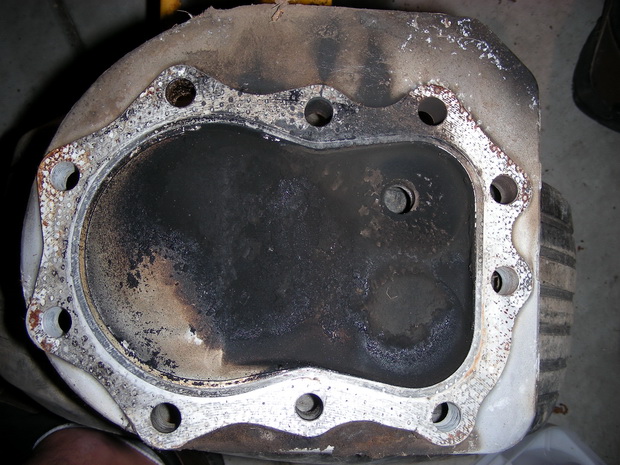 . 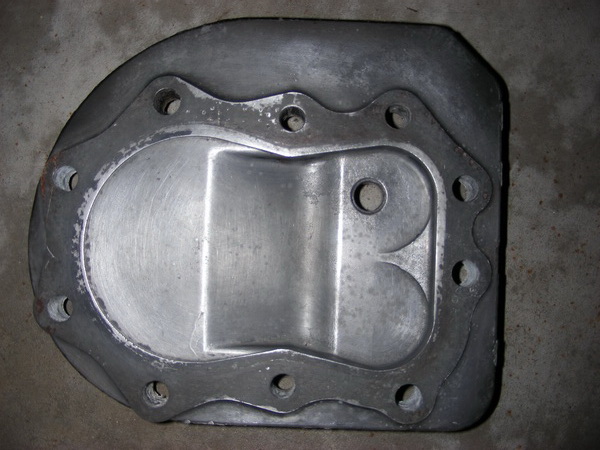
|
|
#35
06-26-2011, 10:35 PM
|
||||
|
||||
|
Today I worked mostly on tins and brackets, not a lot that's interesting to report there. However, I did want to pass on this one little tip. I started cleaning them up with this flap wheel disc on my 3/8" drill.
. 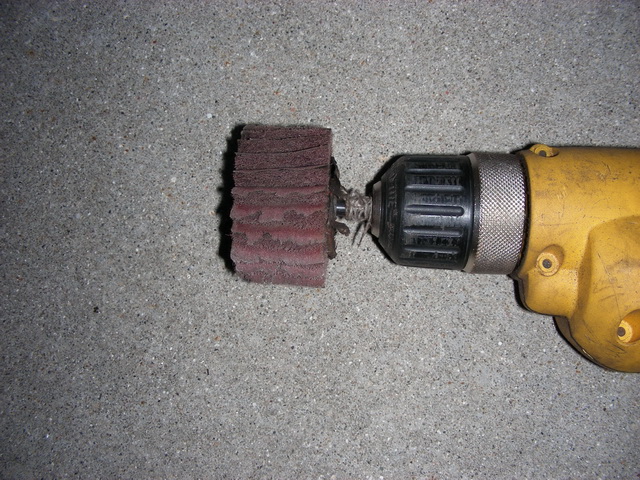 . It's just fantastic for this stuff. Very fast, not too harsh. They clean off all the grime, and will remove rust and paint if you work it a little more. You can hold a part in one hand and clean with the other, and it's not going to rip you up if you bump your hand. As you can see, mine's pretty worn out, so I'll pick up a new one tomorrow. Here's the gas tank brackets, one before cleaning, the other after hitting it with the wheel. It only takes a few minutes: 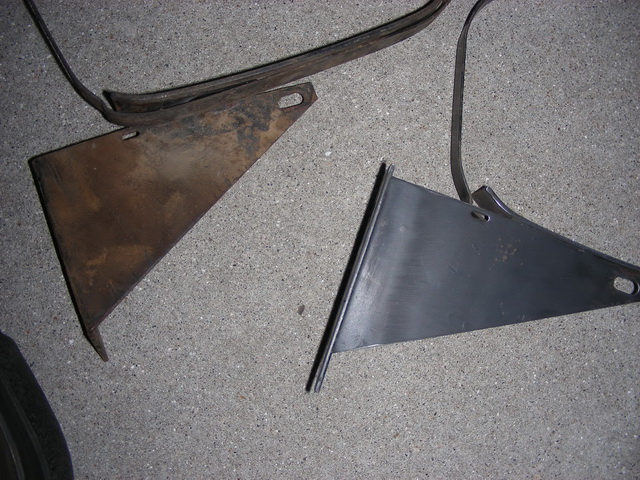
|
|
#37
06-26-2011, 11:26 PM
|
||||
|
||||
|
I had it sitting in the toolbox and didn't check it before I wore it down, but I know it's a higher grit, probably in the 300-400 range. It even did a great job stripping away gummy sticky stuff, like the residue from rubber trim.
|
|
#38
06-26-2011, 11:31 PM
|
||||
|
||||
|
Think I need to stock up on some of those for when I do my deck. Thanks.
__________________
DWayne 1973: 128, ag tires, 3pt. lift, spring assist, lights, 42" Deck 10" moldboard plow 2016 XT1 42" deck 18HP
|
|
#39
06-28-2011, 08:01 PM
|
||||
|
||||
|
OK, so I need to get a valve spring compressing tool. Looking around on the web, I see two different styles. I'll call them "scissor" and "c-clamp." Check out the pics;
C-Clamp: 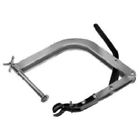 . Scissor: 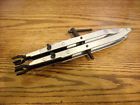 . Anyone have experience working with both of these? My initial impression is that the scissor style looks like it's much easier to work with since you don't have to have that clamp slipping around. Plus, the scissor style holds the whole thing together while you reassemble it. Thoughts? Darn the expenses...
|
|
#40
06-28-2011, 08:10 PM
|
||||
|
||||
|
I actually like the C clamp myself but I used the bottom style on my 128 this time around. with the C clamp your place the flat end on top of the valve and the lower jars up under the keeper retainer cup. Adjust the clamp down till the keepers are visible and are able to be removed. It works just like vice grips. Adjust tension and squeeze handle closed to lock in place. Adjust till you get it just right.
With the scissor style slide one jaw up high on the spring and the lower jaw under the keeper retainer cup. Close it and remover the keepers. Just be careful is and when it slips off  . .On a side note, a $5 door spring compressor at your local auto parts store works just as good. Is what my spring compressor is. Hope this makes some sense?
__________________
DWayne 1973: 128, ag tires, 3pt. lift, spring assist, lights, 42" Deck 10" moldboard plow 2016 XT1 42" deck 18HP
|
|
|
|
Cub Cadet is a premium line of outdoor power equipment, established in 1961 as part of International Harvester. During the 1960s, IH initiated an entirely new line of lawn and garden equipment aimed at the owners rural homes with large yards and private gardens. There were a wide variety of Cub Cadet branded and after-market attachments available; including mowers, blades, snow blowers, front loaders, plows, carts, etc. Cub Cadet advertising at that time harped on their thorough testing by "boys - acknowledged by many as the world's worst destructive force!". Cub Cadets became known for their dependability and rugged construction.
MTD Products, Inc. of Cleveland, Ohio purchased the Cub Cadet brand from International Harvester in 1981. Cub Cadet was held as a wholly owned subsidiary for many years following this acquisition, which allowed them to operate independently. Recently, MTD has taken a more aggressive role and integrated Cub Cadet into its other lines of power equipment.
This website and forum are not affiliated with or sponsored by MTD Products Inc, which owns the CUB CADET trademarks. It is not an official MTD Products Inc, website, and MTD Products Inc, is not responsible for any of its content. The official MTD Products Inc, website can be found at: http://www.mtdproducts.com. The information and opinions expressed on this website are the responsibility of the website's owner and/or it's members, and do not represent the opinions of MTD Products Inc. IH, INTERNATIONAL HARVESTER are registered trademark of CNH America LLC
All material, images, and graphics from this site are the property of www.onlycubcadets.net. Any unauthorized use, reproductions, or duplications are prohibited unless solely expressed in writing.
Cub Cadet, Cub, Cadet, IH, MTD, Parts, Tractors, Tractor, International Harvester, Lawn, Garden, Lawn Mower, Kohler, garden tractor equipment, lawn garden tractors, antique garden tractors, garden tractor, PTO, parts, online, Original, 70, 71, 72, 73, 76, SO76, 80, 81, 86, 100, 102, 104, 105, 106, 107, 108,109, 122, 123, 124, 125, 126, 127, 128, 129, 147, 149, 169, 182, 282, 382, 482, 580, 582, 582 Special, 680, 682, 782, 782D, 784, 800, 805, 882, 982, 984, 986, 1000, 1015, 1100, 1105, 1110, 1200, 1250, 1282, 1450, 1512, 1604, 1605, 1606, 1610, 1615, 1620, 1650, 1710, 1711, 1712, 1806, 1810, 1811, 1812, 1912, 1914.


 Linear Mode

