
|
PLEASE PATRONIZE OUR SPONSORS!


|
|||||||
 |
|
|
Thread Tools | Display Modes |
|
#171
 07-24-2011, 12:11 AM
|
||||
|
||||
|
Quote:
I recommend a couple tips for you, one is get some type of water trap to use when painting, the ones that screw on to the air line at the gun that are disposable work great. Also, you mentioned bugs getting in the paint, if they do, leave them till its dry, trying to get them out when the paint is wet will make even a bigger mess than the bug did to start with.
__________________
Jeff Brookfield, MO ________________ IH Red 782 with weights and sleeve hitch! IH snow blade, Brinly plow, Brinly disk, Brinly harrow, Johnson rear blade, and a #2 IH Cart 
|
|
#172
07-24-2011, 12:23 AM
|
||||
|
||||
|
Thanks guys, that eases my mind. Everyone who writes about painting seems to think that everyone else needs a giant professional setup. I just want to do a tractor, and I doubt I'll be painting anything else for a long time.
|
|
#173
07-24-2011, 12:49 PM
|
||||
|
||||
|
As far as the painting goes, it usually seems like you're racing the clock because of the flash time of BC/CC paint & the coverage area you are painting. You'll be able to see where you stopped shooting in a large panel when you're done, especially in a somewhat transparent paint. For what we do, a little compressor will do since you will be jumping from part to part to shoot. Having the parts strung up in a line to shoot certainly helps, but it will also give your compressor time to recover. We aren't shooting any wild anyways...
__________________
Mike  - Ramsey, MN - Ramsey, MN'65 100 - #126432 Options: V61's, 8.5" Tru-Powers, stock sleeve hitch, Xtreme sleeve hitch adapter Attachments: Dad's 42" Dozer Blade & 38" 3-spindle deck, 42U deck, Homemade Sleeve Hitch Dethatcher & a QA36A Snowthrower Mods: K301 Upgrade, IHinIN's clutch pivot upgrade, SST driveshaft, custom bar axles "Why buy something shiny & new when you can save something old."
|
|
#174
07-24-2011, 01:13 PM
|
||||
|
||||
|
My engine's still at the machine shop, but I was reading about aligning the camshaft and crankshaft. This image from the service manual won't be too helpful. I've read about a lot of problems that stem from not getting this right, so if anyone has better images, tips, etc. it would be much appreciated.
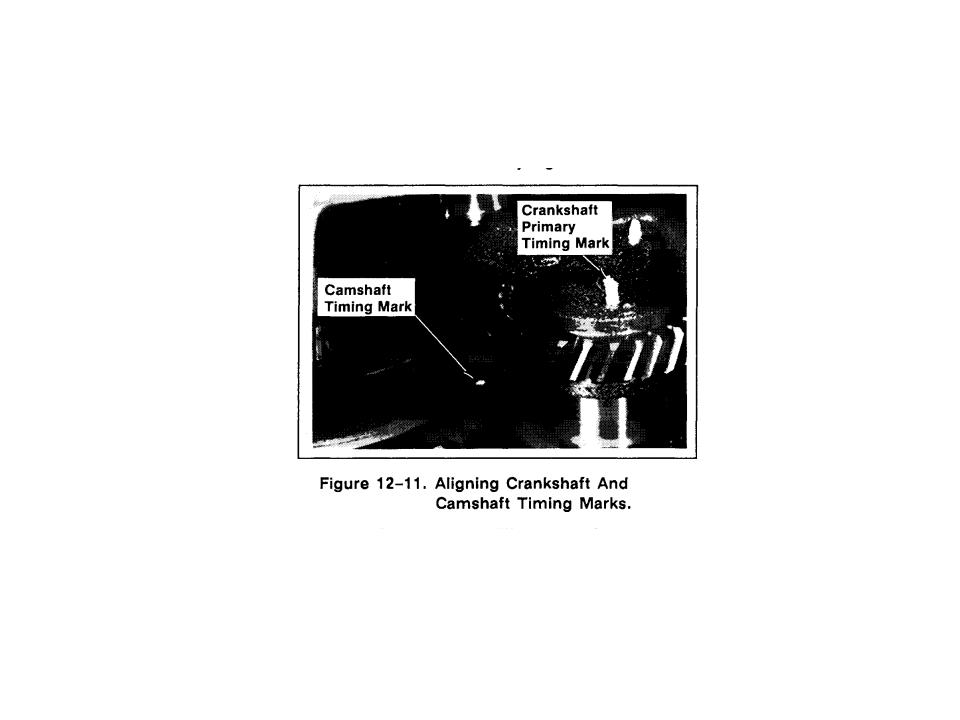 I think a tip I read from Matt G. in another post will be key: Quote:
|
|
#175
07-24-2011, 01:22 PM
|
||||
|
||||
|
There's a bump on the crank aligned with one of the teeth, and a divot on the cam aligned with one of the spaces between the teeth. Make sure that crank gear tooth is in that space between teeth on the cam gear marked with the divot and you'll be fine.
|
|
#176
07-24-2011, 02:40 PM
|
||||
|
||||
|
OK, thanks Matt. I'll re-read when I get it back from the shop.
|
|
#177
07-24-2011, 03:13 PM
|
||||
|
||||
|
I have no idea how I'm going to get this trunnion assembly and damper spring plate off this shaft.
. 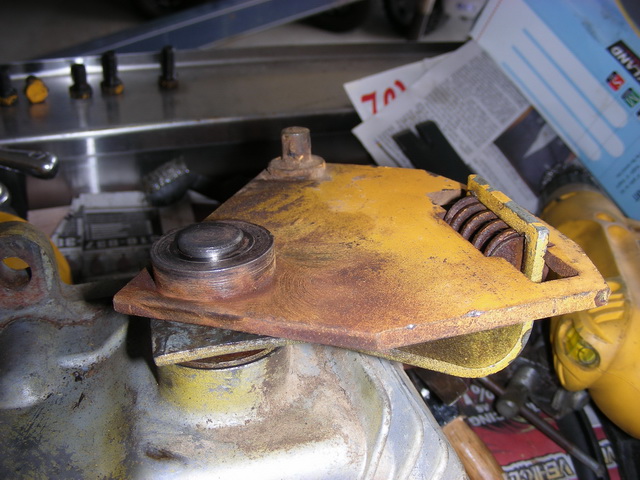 They don't move independently of one another, so I know they need to be removed, cleaned, and lubed. It all appears to be stuck as bad as this prior assembly I had difficulty with:  . But with that assembly, I had the luxury of putting the whole thing in a vise and tapping the bracket back and forth around the shaft while putting upward pressure on it. With this one, I can't really beat on it at all because I don't want to damage anything internal that's holding that shaft in place. I'm concerned that I may have already hurt something internal, not knowing what's going on in there. I've soaked it overnight with penetrating oil, wirewheeled the little bit of exposed shaft, heated it, put a pry bar between the two brackets...this thing isn't going to budge. help, please! Am I going to have to open up the hydro and get that whole shaft out of there?
|
|
#178
07-24-2011, 03:16 PM
|
||||
|
||||
|
I assume that outer plate must rotate freely on the shaft, while the trunnion assembly would be somehow mounted to the shaft to actually rotate the shaft (key or something?) is this correct?
|
|
#179
07-24-2011, 03:42 PM
|
||||
|
||||
|
The trunion is spirol-pinned to the trunion shaft inside the unit, and the damper spring plate pivots freely on the trunion shaft.
You probably won't be able to heat it enough to do any good without destroying either the seal or the heat treatment on the shaft. What I would do is try to rig up a harmonic balancer puller or some similar puller on there. That should pop it off- just be careful not to mushroom the end of the shaft. While you work on that, continue soaking it in PB blaster.
|
|
#180
07-24-2011, 04:36 PM
|
||||
|
||||
|
Good news - I got it. Right after I wrote that last post, I studied the drawings and thought about it some more, and the only thing I could conclude is that I'd need more heat.
I was being very gentle with the heat earlier. Remember, I only have a plumbers torch, so it's not like I can get this thing red hot or anything. So I gave it more heat, then applied upward pressure with the pry bar, and rotated the shaft all the way one way and the other while I tapped it just enough to compress the small spring (so I could get some rotation on that shaft.) It popped free, and now I have it all cleaned up, greased, and reassembled with new springs. I've seen where other guys have had to reshape the brackets from wear, but mine looked nice and square on all the corners. (edit 7/30/11 - you'll see later that I was looking at the outer plate when I assessed things as "square." I did some more reading later and realized that the trunnion bracket itself was where the wear occurs. At first, I thought the notches in it were to hold the spring seats in place. It turns out that these were the wear points.) On to the next thing...
|
|
|
|
Cub Cadet is a premium line of outdoor power equipment, established in 1961 as part of International Harvester. During the 1960s, IH initiated an entirely new line of lawn and garden equipment aimed at the owners rural homes with large yards and private gardens. There were a wide variety of Cub Cadet branded and after-market attachments available; including mowers, blades, snow blowers, front loaders, plows, carts, etc. Cub Cadet advertising at that time harped on their thorough testing by "boys - acknowledged by many as the world's worst destructive force!". Cub Cadets became known for their dependability and rugged construction.
MTD Products, Inc. of Cleveland, Ohio purchased the Cub Cadet brand from International Harvester in 1981. Cub Cadet was held as a wholly owned subsidiary for many years following this acquisition, which allowed them to operate independently. Recently, MTD has taken a more aggressive role and integrated Cub Cadet into its other lines of power equipment.
This website and forum are not affiliated with or sponsored by MTD Products Inc, which owns the CUB CADET trademarks. It is not an official MTD Products Inc, website, and MTD Products Inc, is not responsible for any of its content. The official MTD Products Inc, website can be found at: http://www.mtdproducts.com. The information and opinions expressed on this website are the responsibility of the website's owner and/or it's members, and do not represent the opinions of MTD Products Inc. IH, INTERNATIONAL HARVESTER are registered trademark of CNH America LLC
All material, images, and graphics from this site are the property of www.onlycubcadets.net. Any unauthorized use, reproductions, or duplications are prohibited unless solely expressed in writing.
Cub Cadet, Cub, Cadet, IH, MTD, Parts, Tractors, Tractor, International Harvester, Lawn, Garden, Lawn Mower, Kohler, garden tractor equipment, lawn garden tractors, antique garden tractors, garden tractor, PTO, parts, online, Original, 70, 71, 72, 73, 76, SO76, 80, 81, 86, 100, 102, 104, 105, 106, 107, 108,109, 122, 123, 124, 125, 126, 127, 128, 129, 147, 149, 169, 182, 282, 382, 482, 580, 582, 582 Special, 680, 682, 782, 782D, 784, 800, 805, 882, 982, 984, 986, 1000, 1015, 1100, 1105, 1110, 1200, 1250, 1282, 1450, 1512, 1604, 1605, 1606, 1610, 1615, 1620, 1650, 1710, 1711, 1712, 1806, 1810, 1811, 1812, 1912, 1914.


 Linear Mode

