
|
PLEASE PATRONIZE OUR SPONSORS!


|
|||||||
 |
|
|
Thread Tools | Display Modes |
|
#1
 05-19-2010, 10:49 AM
|
|||
|
|||
|
All, a couple of questions. First, re the crank shaft seal behind the PTO, how do you get the darned thing out? I’ve pulled the entire PTO off and the seal is loose on the shaft, but there is nothing to get hold of to pull it out…
Second, please refer to pics. The PTO was working prior to disassembly, but looking at it, it doesn’t look so hot… There is some sort of coating missing from an area on the front of the PTO bracket and on the backside the insulation on the tiny wire seems worn off. I’m wondering if either of these should be rectified (if so, how?) prior to reassembly – or does this mean the PTO is shot and I was lucky it was working at all? Note, pic #4 the assembly is rotated 90 degrees from correct orientation for better view of damage... Thanks for any input, -Calvin 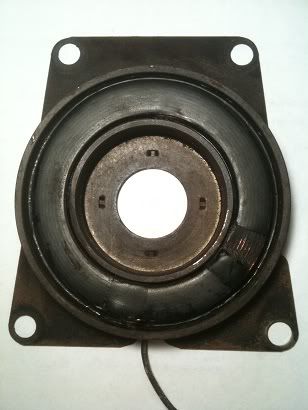 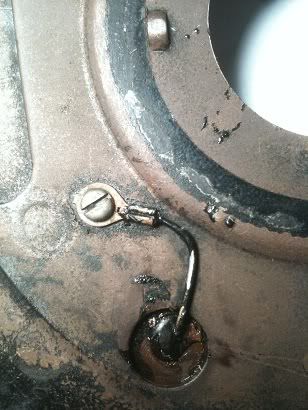 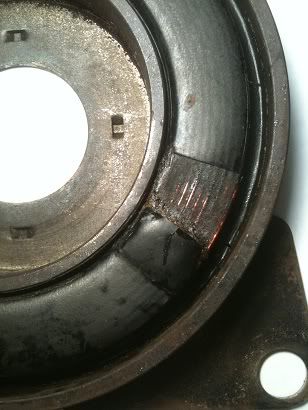 

|
|
#2
05-19-2010, 11:44 AM
|
|||
|
|||
|
Calvin:
To get the seal out, you could drill a small hole in the face of the seal and install something like a drywall screw. Once the screw is in and has a good bite, then pull the seal out. You can check the PTO coil by clicking on this link to see if it falls with spec's: Specs The "coating" on the PTO can be patched a number of different ways. You can use a high temp silicon sealant or mix up a batch of JB Weld. The #2 picture shows the "ground" connection of the PTO coil. Not necessary to do anything with that.
__________________
[B]Roland Bedell[/B] CC Models: 100, 105, 1450, 782, (2) 784, & 2072 [SIZE="4"][B][COLOR="Red"]Buy:[/COLOR][COLOR="Blue"] Made in the USA[/COLOR][/B] [/SIZE]:American Flag 1:
|
|
#4
05-19-2010, 03:41 PM
|
|||
|
|||
|
I hope I explain this in a way that makes sense… I tried drilling a small hole (for drywall screw method) in the seal last night - but the metal shavings from drilling the hole had me stop almost as soon as I started. The seal its self is a metal cup with a rubber outer coating and flange that sits up against the block. The seal (at least in my tractor) will slide into the block far enough that the rubber flange no longer seals - there is about a 1/8" gap between the outermost edge of the seal and the very inside lip of the block. Through this gap I saw the possibility of small metal chips/shaving falling down into the block - so I stopped drilling. I guess it is possible that the PO used a seal of the wrong size/type. It looks like the one I got in the gasket kit, but I can't do a side-by-side until I have the old one out. The existing seal pushes into the block when you press in on it to drill the hole. It can't fall down inside as the crank shaft passes through it, but, at least in my case, it pushes in enough past the area on the block it should seal against that something could easily fall down inside. That's why I posted, I was thinking there might be a better method.
Hope this helps, -Calvin
|
|
#5
05-19-2010, 07:23 PM
|
|||
|
|||
|
I had the same problem on my 122, seal was pushed in too far. All I needed to do was find a thin sharp punch and use that to make the hole for the screw.....if you hold your tongue just right and squint a little it will almost fall out once you have a grip on it and manuver it to the right sweet spot. A longer sheet rock screw or deck screw worked better as you have more of a handle... Two screws can be used for a more manly grip. :biggrin2.gif:
__________________
Quietlines and narrow frames, mostly projects but I mow with a 1200 and have a 122 set up for pulls. Wandering the country bringing towers to wind farms everywhere, and bringing yellow stuff home to Texas. Also into flatfender jeeps.
|
|
#6
05-19-2010, 10:36 PM
|
|||
|
|||
|
Well, finally got it - thanks for all of the help guys. First, the seal puller did not work - so taking it back tomorrow
 I ended up using the drill/screw method. I used a screw driver to push the bottom in, which kicked the top out. I then kelp pressure with the driver (to keep seal canted) while I drilled. This allow the shavings to fall onto the channel where the seal would normally sit. I then sucked them out with a shop vac before "installing" the removal device. (course threaded, 2.5" drywall screw) As stated, it popped right out a swept the remaining bits of metal along with it. Getting the new one in was about as much fun I ended up using the old seal (flipped around backwards) to lightly tap the new one into place. All I can say is the fit is MUCH tighter than the one that came out...Thanks again, -Calvin
|
|
|
|
Cub Cadet is a premium line of outdoor power equipment, established in 1961 as part of International Harvester. During the 1960s, IH initiated an entirely new line of lawn and garden equipment aimed at the owners rural homes with large yards and private gardens. There were a wide variety of Cub Cadet branded and after-market attachments available; including mowers, blades, snow blowers, front loaders, plows, carts, etc. Cub Cadet advertising at that time harped on their thorough testing by "boys - acknowledged by many as the world's worst destructive force!". Cub Cadets became known for their dependability and rugged construction.
MTD Products, Inc. of Cleveland, Ohio purchased the Cub Cadet brand from International Harvester in 1981. Cub Cadet was held as a wholly owned subsidiary for many years following this acquisition, which allowed them to operate independently. Recently, MTD has taken a more aggressive role and integrated Cub Cadet into its other lines of power equipment.
This website and forum are not affiliated with or sponsored by MTD Products Inc, which owns the CUB CADET trademarks. It is not an official MTD Products Inc, website, and MTD Products Inc, is not responsible for any of its content. The official MTD Products Inc, website can be found at: http://www.mtdproducts.com. The information and opinions expressed on this website are the responsibility of the website's owner and/or it's members, and do not represent the opinions of MTD Products Inc. IH, INTERNATIONAL HARVESTER are registered trademark of CNH America LLC
All material, images, and graphics from this site are the property of www.onlycubcadets.net. Any unauthorized use, reproductions, or duplications are prohibited unless solely expressed in writing.
Cub Cadet, Cub, Cadet, IH, MTD, Parts, Tractors, Tractor, International Harvester, Lawn, Garden, Lawn Mower, Kohler, garden tractor equipment, lawn garden tractors, antique garden tractors, garden tractor, PTO, parts, online, Original, 70, 71, 72, 73, 76, SO76, 80, 81, 86, 100, 102, 104, 105, 106, 107, 108,109, 122, 123, 124, 125, 126, 127, 128, 129, 147, 149, 169, 182, 282, 382, 482, 580, 582, 582 Special, 680, 682, 782, 782D, 784, 800, 805, 882, 982, 984, 986, 1000, 1015, 1100, 1105, 1110, 1200, 1250, 1282, 1450, 1512, 1604, 1605, 1606, 1610, 1615, 1620, 1650, 1710, 1711, 1712, 1806, 1810, 1811, 1812, 1912, 1914.


 Linear Mode

